Getting Started with RoboLink

Welcome to RoboLink
RoboLink lets you wirelessly control any ESP32 (or Arduino) robot from your Android phone. Tap a joystick, button, or slider on the app — values arrive at your board in milliseconds. You can also send sensor readings back to the app for live display.
This tutorial walks you from zero to a working connection in about 20 minutes.
Step 1: Install the App
Download RoboLink from the Google Play Store. The app is free and requires no account.
RoboLink supports WiFi (UDP), Bluetooth Classic, and Serial connections. This tutorial uses WiFi AP mode — the easiest option because the ESP32 creates its own network and your phone connects directly to it, no router needed.
Step 2: Install the Arduino Library
First, grab the library ZIP:
- GitHub Repository — browse source, report issues
- Download ZIP directly
Then add it to Arduino IDE:
- Open Arduino IDE and go to Sketch → Include Library → Add .ZIP Library…
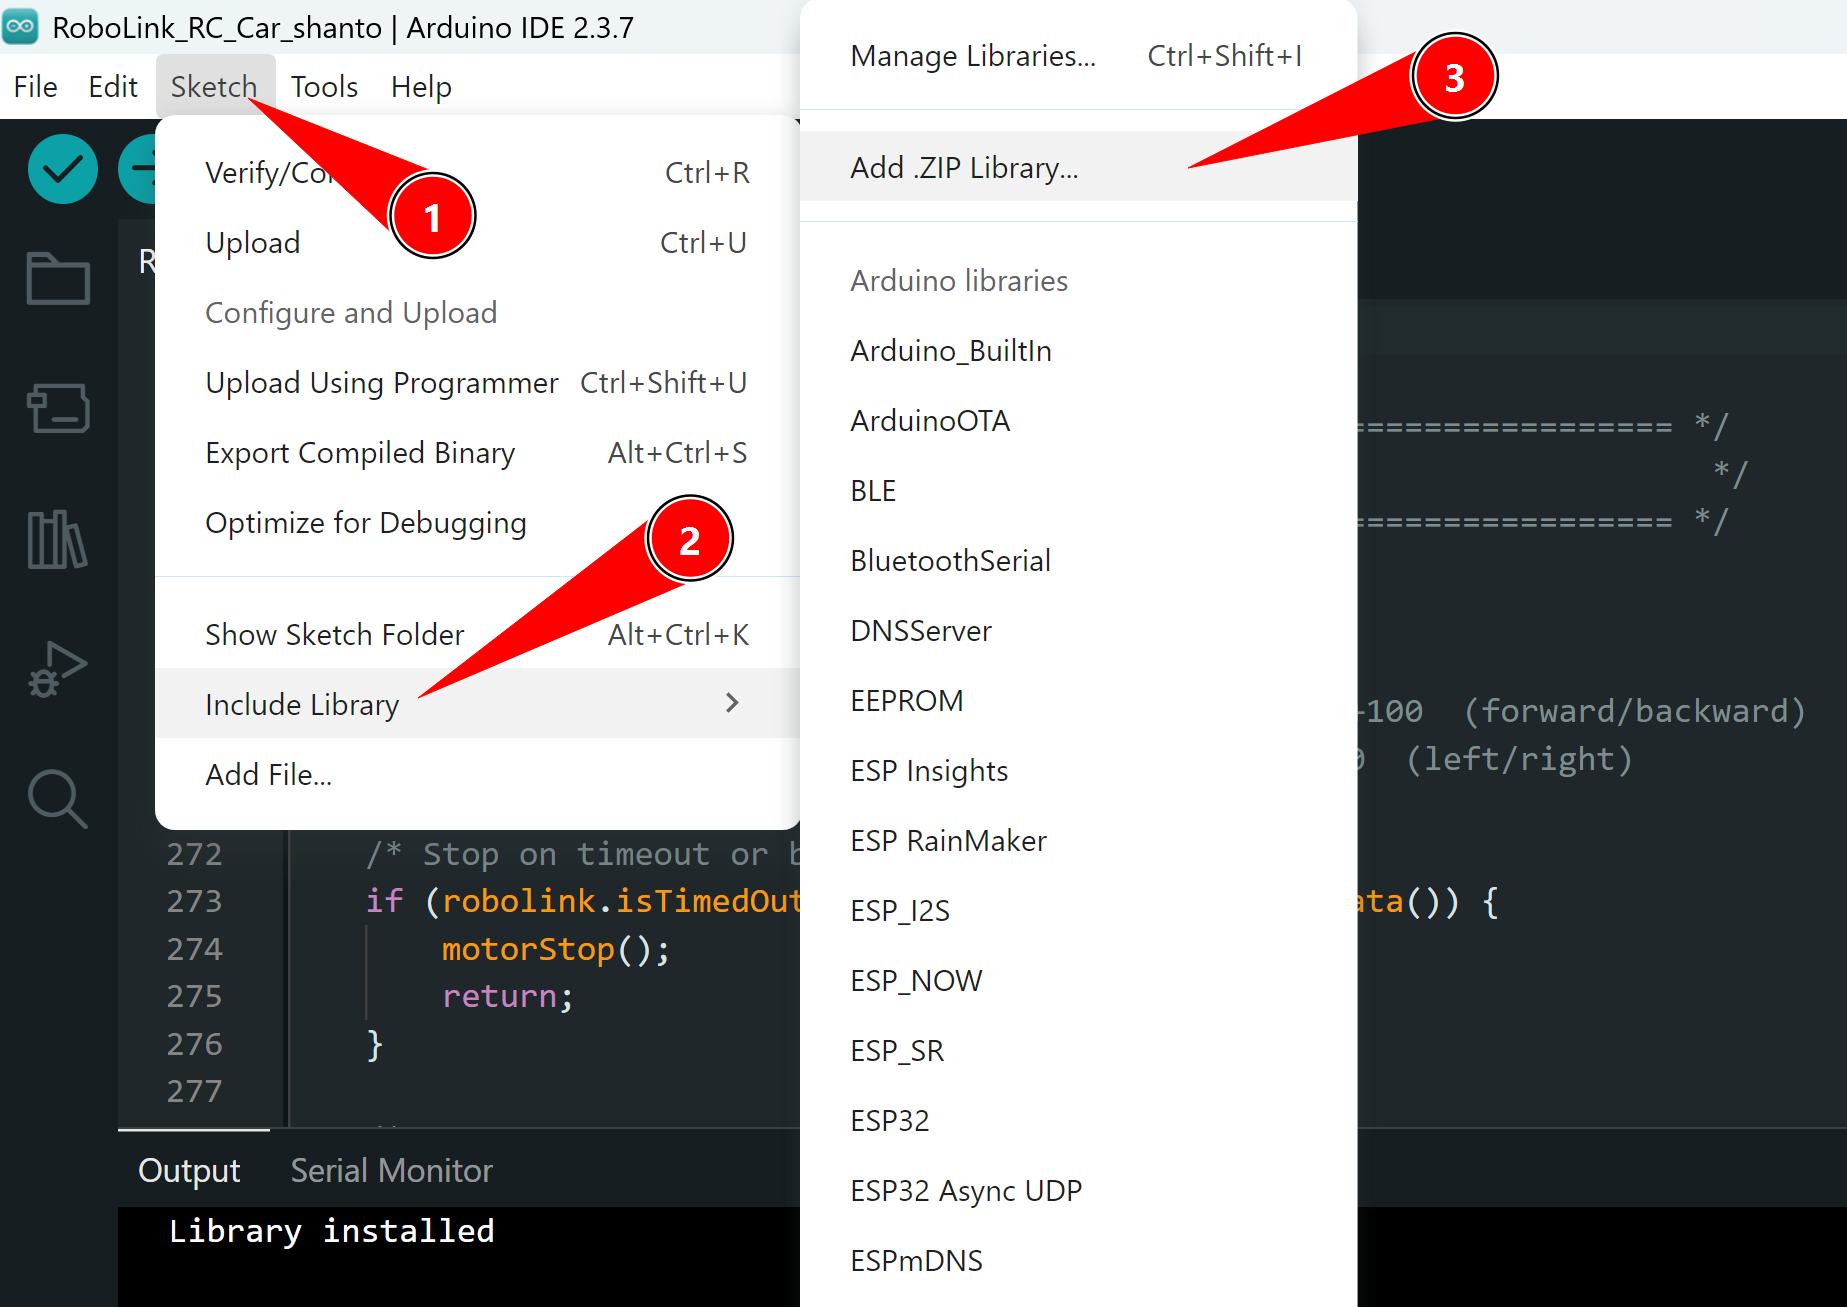
- Select the downloaded ZIP file and click Open.
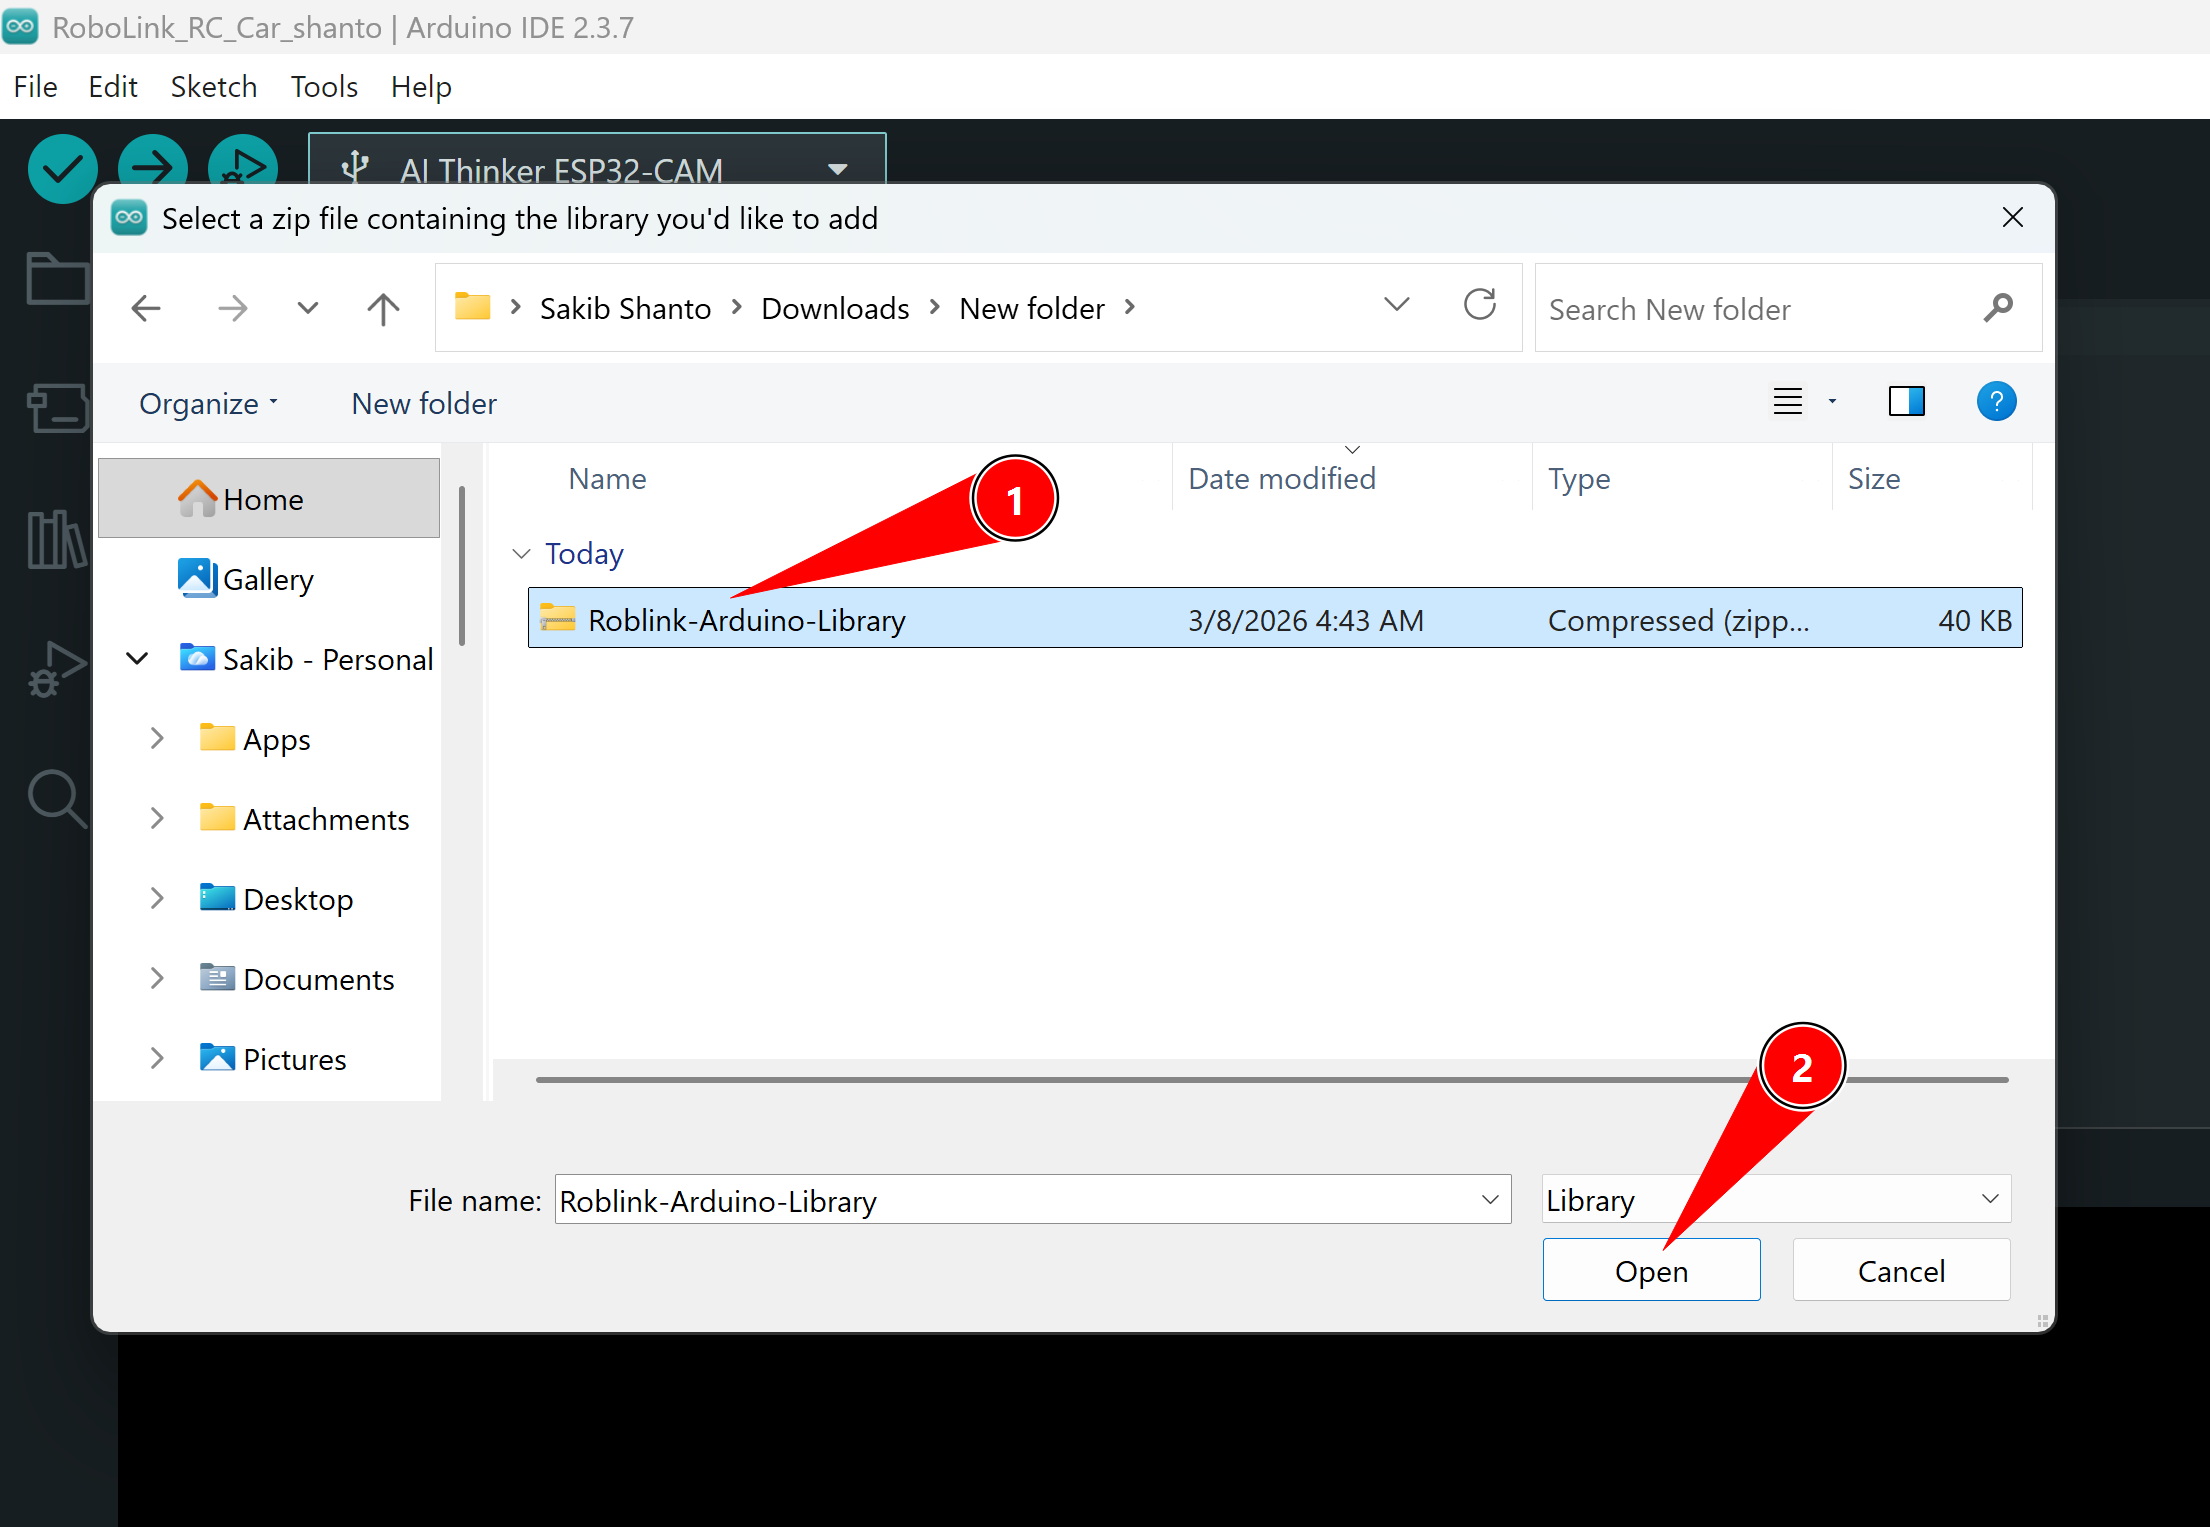
- Restart the IDE.
You should now see RoboLink under Sketch → Include Library.
Step 3: Upload the "Print All Data" Sketch
Before driving any motors, verify the connection works by printing every key-value pair the app sends.
#include <RoboLink.h>

RoboLinkWiFi robolink;

void setup() {
    Serial.begin(115200);

    // ESP32 creates a WiFi hotspot called "MyRobot"
    // Password must be at least 8 characters
    robolink.beginAP("MyRobot", "12345678");

    Serial.println("Access point started. Connect your phone to 'MyRobot'.");
}

void loop() {
    robolink.update();   // always call first — reads incoming packets

    // Print every key:value the app is sending, once per packet
    robolink.printAll(Serial);
}
Upload this to your ESP32, then open the Serial Monitor at 115200 baud.
The printAll() call is the fastest way to debug. It shows exactly which keys the app is sending and what values they carry — very useful when you're not sure of a key name.
Step 4: Connect the App
- On your phone, go to Settings → Wi-Fi and connect to the MyRobot network (password:
12345678). - Open the RoboLink app.
- Tap the connection icon and choose Wi-Fi / UDP.
- The default port is 4210 — leave it as-is and tap Connect.
Once connected, the Serial Monitor will start printing lines like:
throttle:0,steer:0,speed:128,horn:0
throttle:45,steer:-30,speed:128,horn:0
Each line is one packet from the app at ~20 Hz.
Step 5: Read Specific Values
Once you know the key names, read individual values with get():
#include <RoboLink.h>

RoboLinkWiFi robolink;

void setup() {
    Serial.begin(115200);
    robolink.beginAP("MyRobot", "12345678");
    robolink.setTimeoutMs(500);   // safety: detect if phone disconnects
}

void loop() {
    robolink.update();

    // isTimedOut() becomes true if no packet arrives for 500 ms
    if (robolink.isTimedOut()) {
        Serial.println("No signal — stopping!");
        return;
    }

    int throttle = robolink.get("throttle");   // -100 to +100
    int steer    = robolink.get("steer");      // -100 to +100
    int speed    = robolink.get("speed");      //  0 to 255
    int horn     = robolink.get("horn");       //  0 or 1

    Serial.print("throttle="); Serial.print(throttle);
    Serial.print("  steer=");  Serial.print(steer);
    Serial.print("  speed=");  Serial.print(speed);
    Serial.print("  horn=");   Serial.println(horn);
}
Always call robolink.setTimeoutMs(500) and check isTimedOut() before reading controls. If the phone drops the connection your motors would otherwise keep the last value forever.
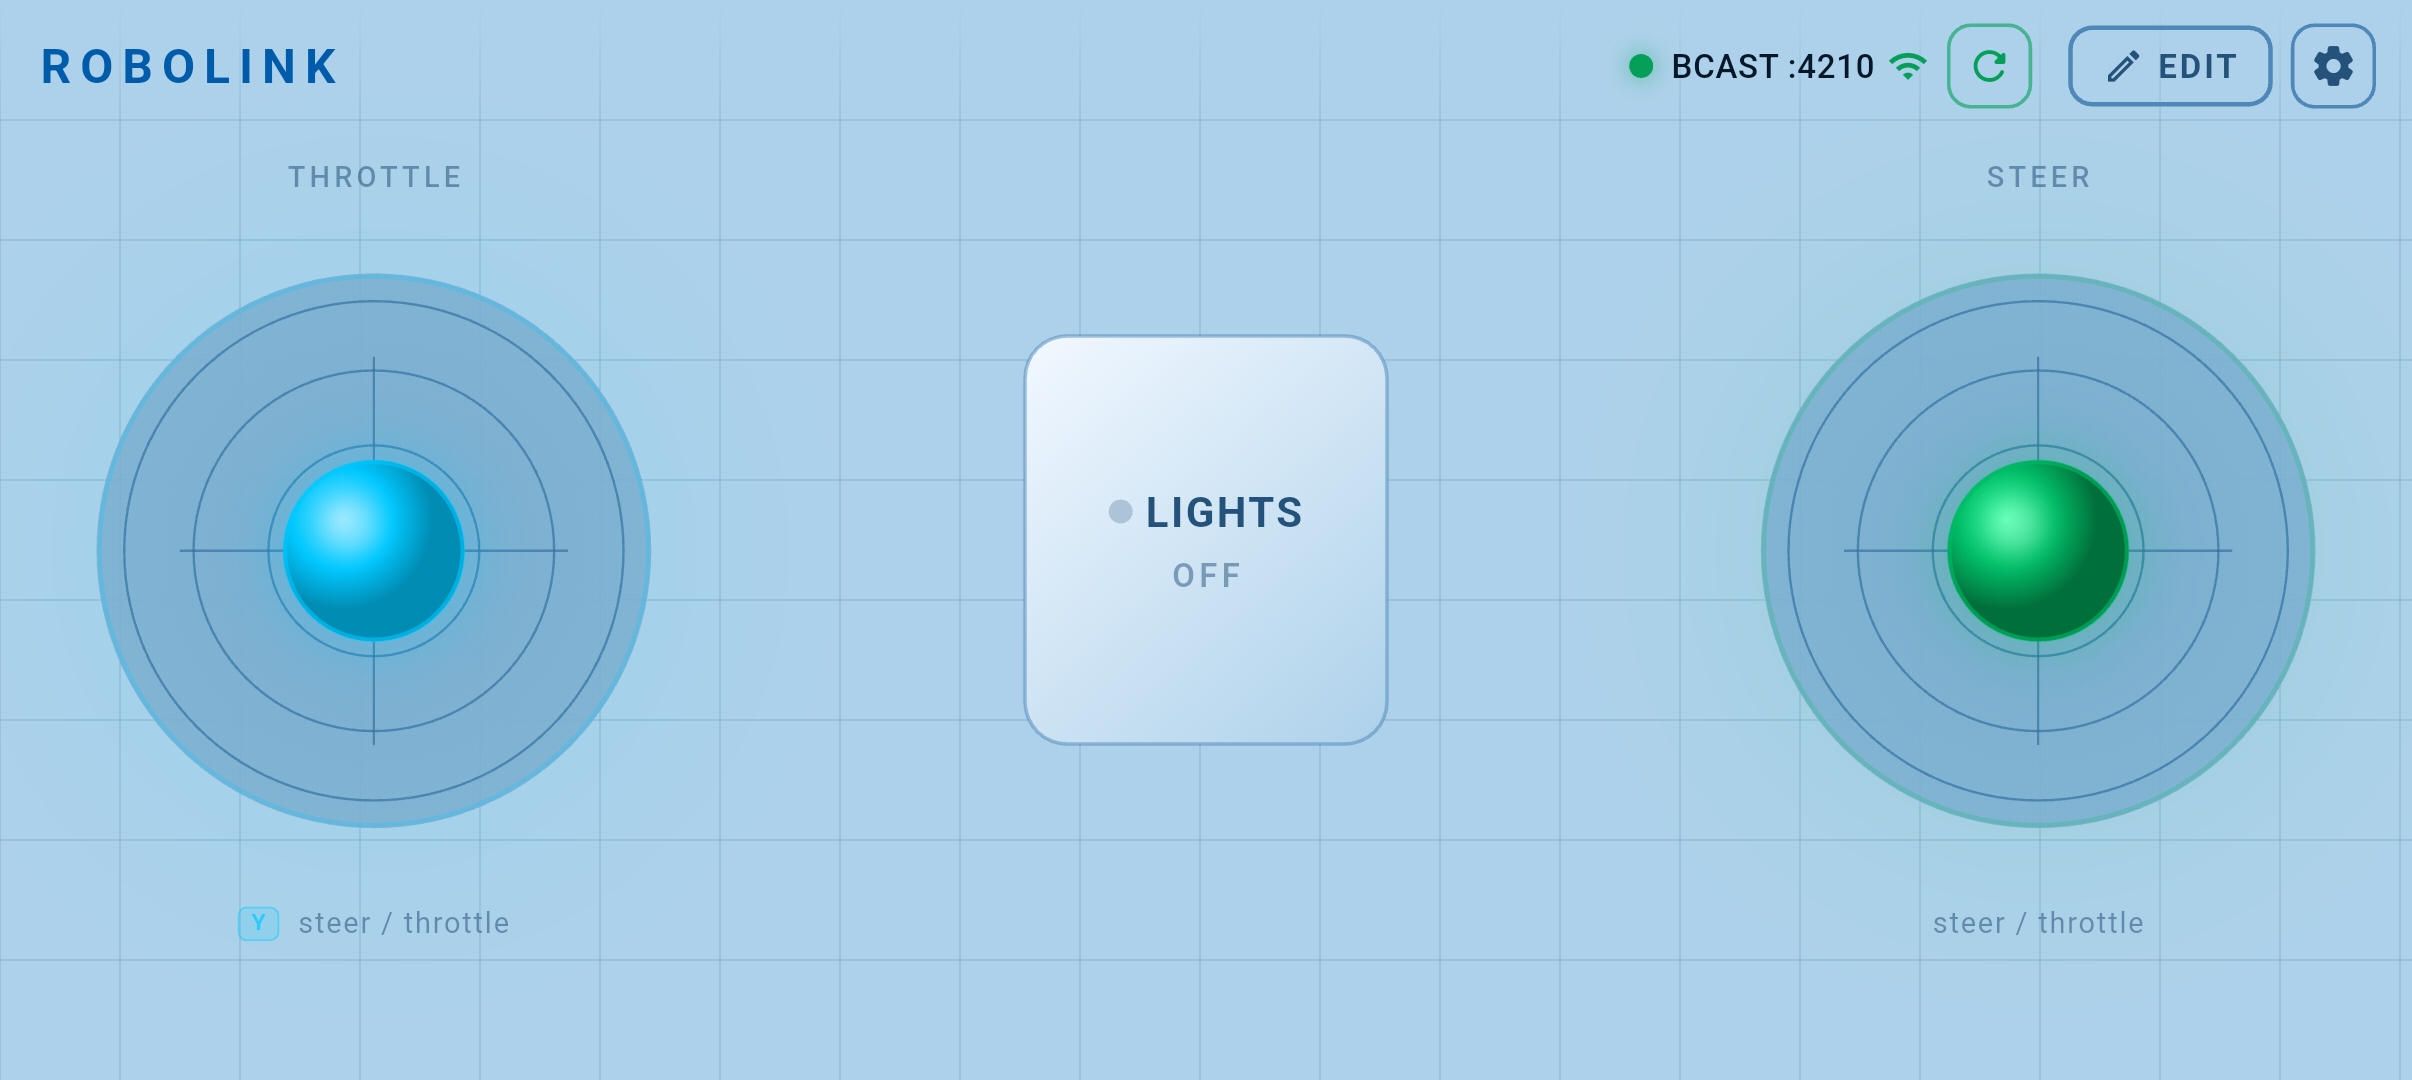
Step 6: Configure the App Interface
Load a preset layout
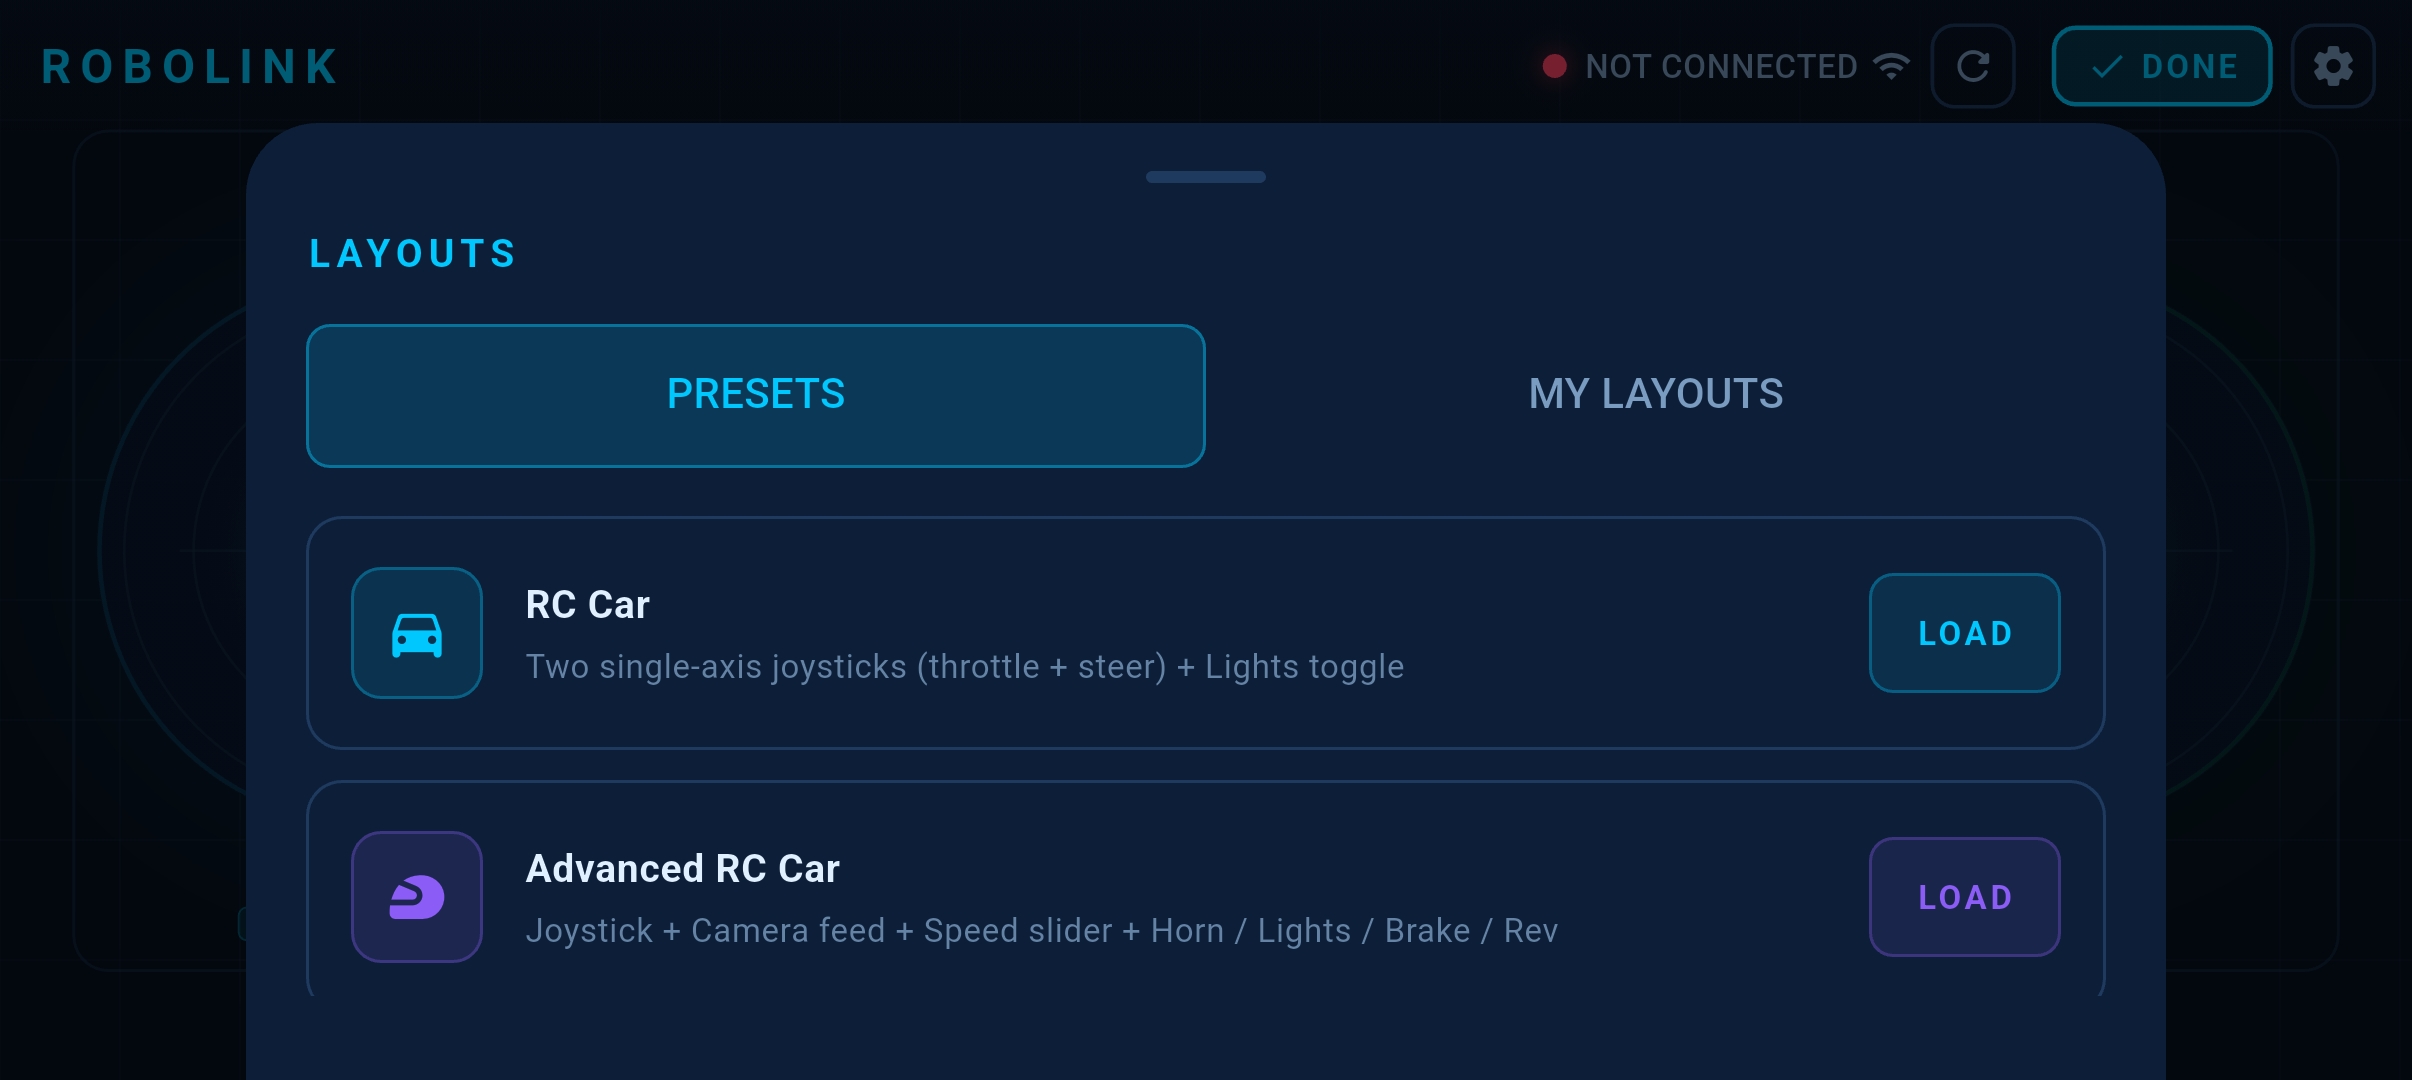
The app ships with built-in layouts for common robot types. Tap the layout / preset button in the app menu and choose one:
| Preset | Keys the app sends |
|---|---|
| RC Car | steer, throttle, speed, horn, lights, brake, reverse |
| Robotic Arm | base, shoulder, elbow, wrist, grip, arm_x, arm_y |
| Drone | roll, pitch, yaw, throttle, speed, arm, photo, rtl |
After loading a preset, open the Serial Monitor running the printAll sketch — you will immediately see the correct key names arrive.
Edit a widget's key name
Every widget has a data key setting. To match your code, long-press (or tap the edit icon on) a widget:
- Joystick → set the X key and Y key fields (e.g.
steerandthrottle) - Button / Toggle → set the data key field (e.g.
horn) - Slider → set the data key and the min / max range
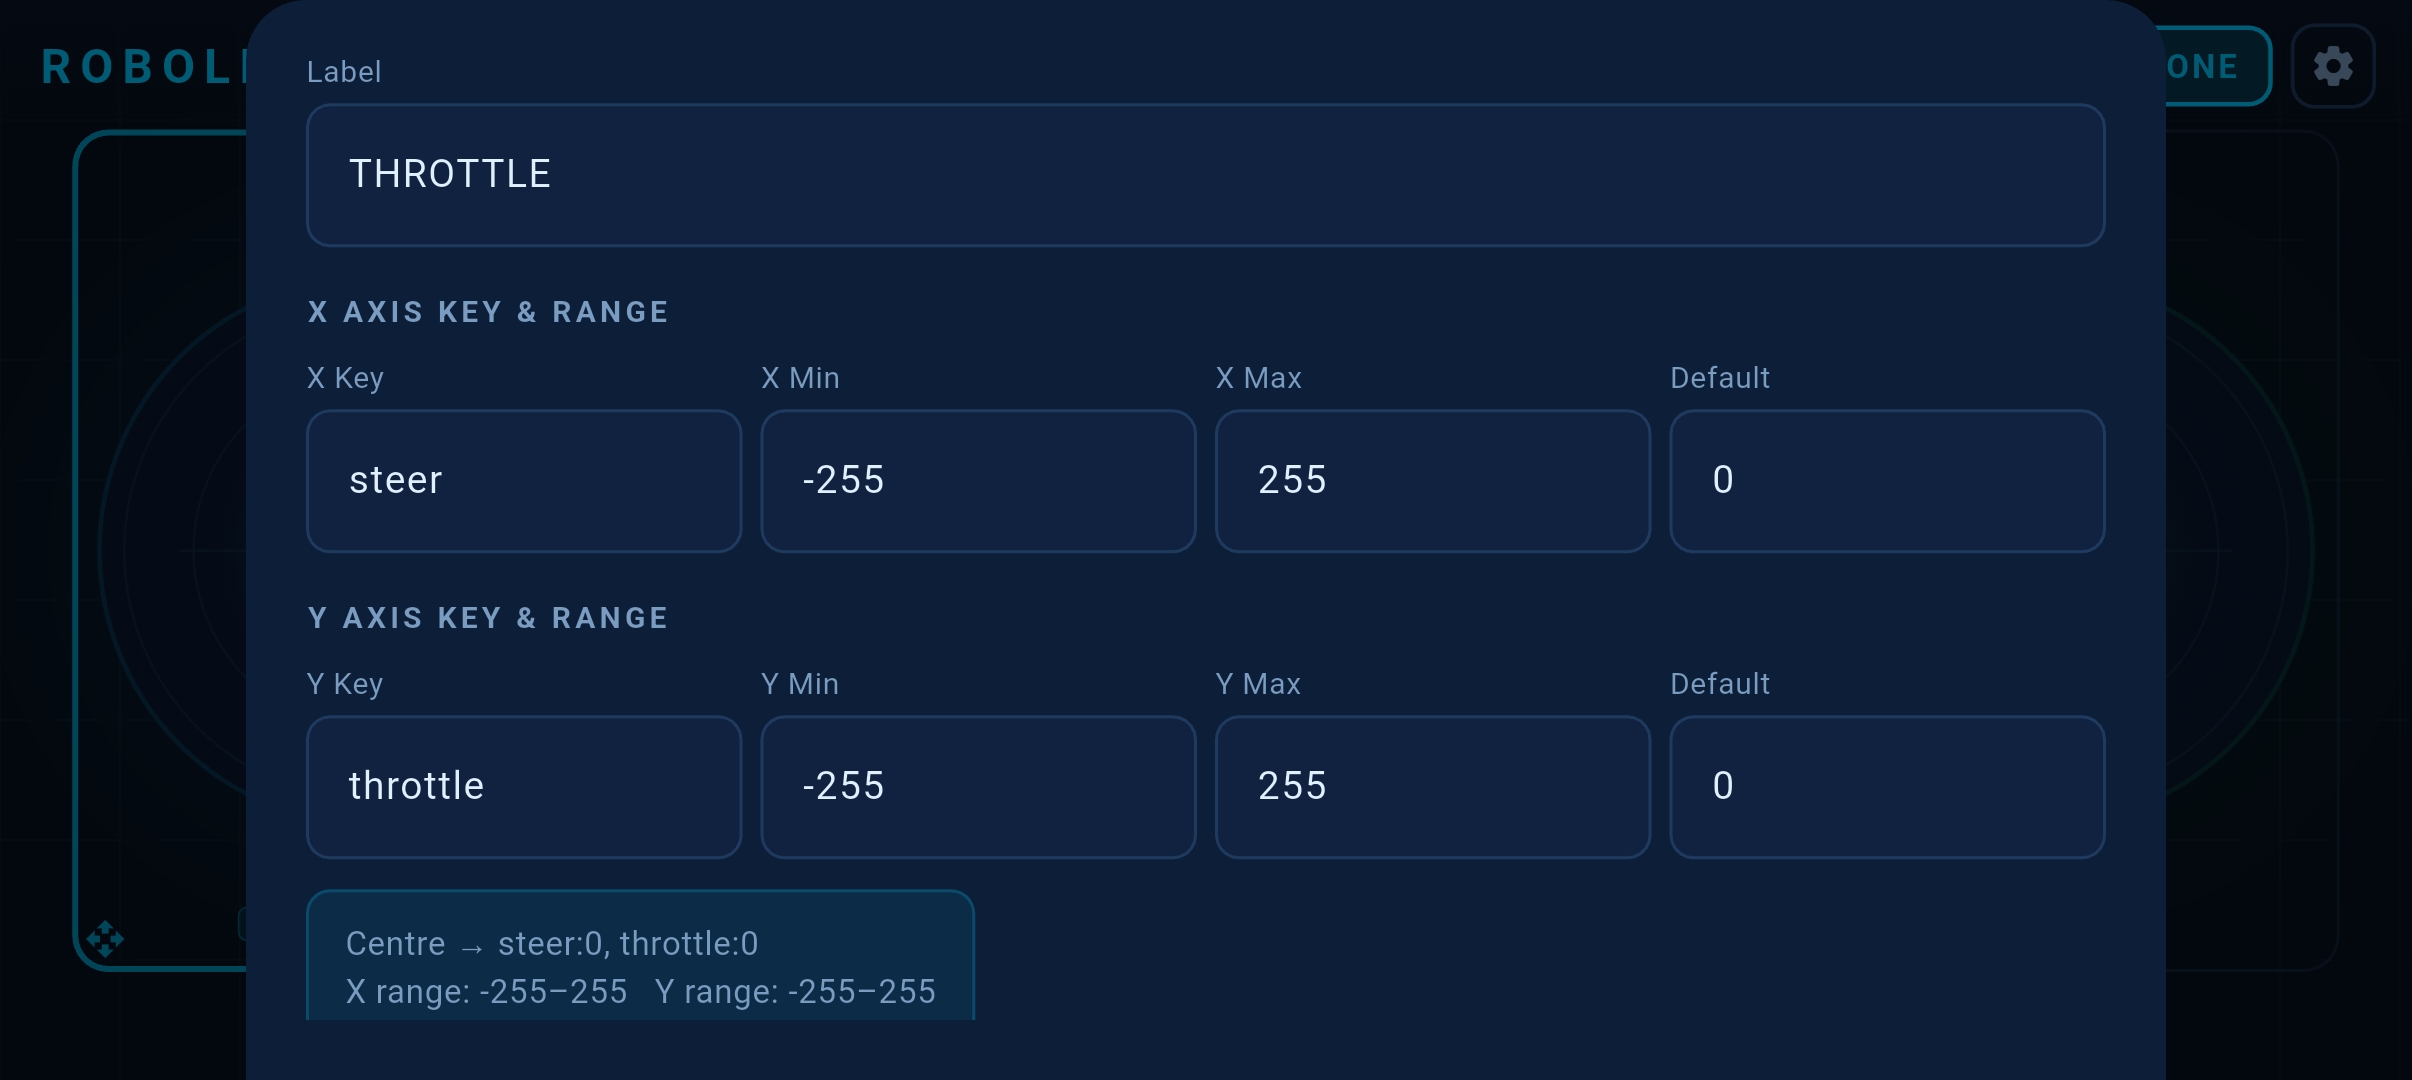
Key names are case-sensitive. Throttle and throttle are different keys. Use printAll() on the ESP32 to confirm the exact names the app is sending before writing your control logic.
Verify key-value pairs live
Use the built-in Serial print approach while adjusting widgets:
void loop() {
    robolink.update();
    robolink.printAll(Serial);   // prints one line per packet — watch it change as you move controls
    delay(100);                  // slow it down so the monitor stays readable
}
Move a joystick, drag a slider, or press a button — the Serial Monitor shows the value changing in real time. This makes it easy to confirm each widget is wired to the right key.
Next Steps
- WiFi Setup in depth — Station mode, credential storage, serial setup wizard
- ESP32-CAM RC Car — Add a live video stream to your robot
- Sensor data — Call
robolink.setSensor("battery", 87)androbolink.setSendInterval(200)to push values back to the app's Gauge widgets